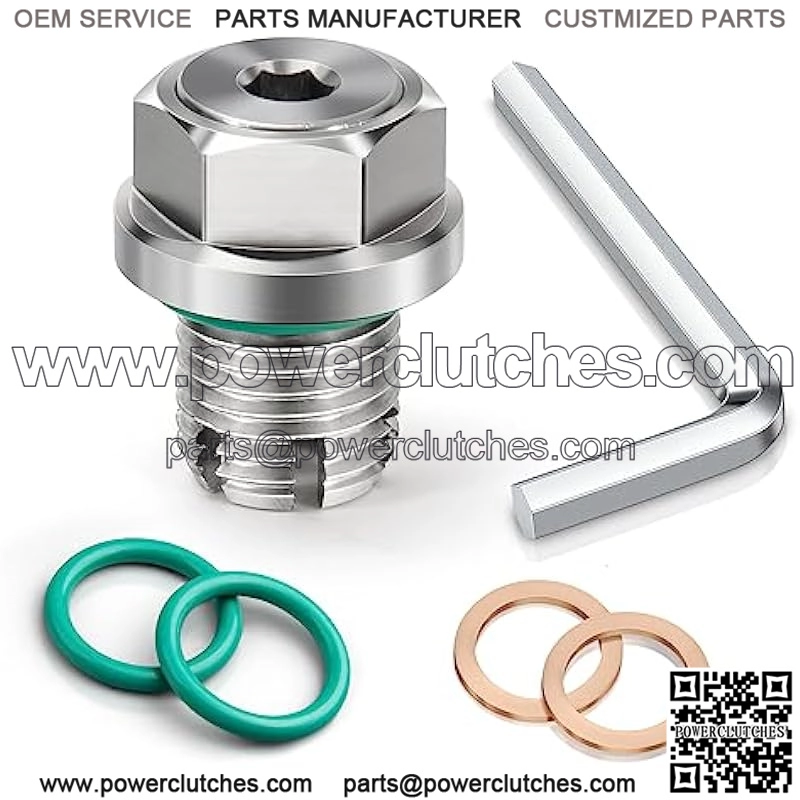
M14.1-1.25 x 15mm Extended Piggyback Oil Drain Plug Stainless Steel Self Tapping Thread For Oil Pan Repair
Introducing the OxyGenie Oversized Piggyback Oil Drain Plug, manufactured from premium 304 stainless steel using advanced CNC cutting technology. With exceptional hardness and precision, this plug effectively repairs oil pan threads for a secure fit. Easy to repair, saves time and money. Theres no need to replace the entire oil pan when you can rely on our oversized Piggyback Motor Oil Drain Plug. Designed to perfectly match the fit and function of the original drain plug, it has undergone rigorous fit testing to ensure a secure, leak-proof seal. The perfect solution. Although there are various thread repair tools available on the market, such as Heli-Coil, Time-Sert, or self-tapping bolt and drain plug repair kits, they present risks and problems. Repairing oil pan threads with these tools requires careful alignment of the tap perpendicular to the oil pan before cutting new threads, otherwise it may result in oil leakage. However, with our Piggyback Oil Drain Plug, fixing slipped oil pan threads is a breeze with just a few simple steps. Kit Includes: 1pc Self-tapping Extra Large Stainless Steel Piggyback Oil Drain Plug, Specification: M14.1-1.25 x 15mm; 1pc L-Shape Hex Key (for Piggyback Drain Plug); 2pcs Fluorine O-Ring for Main Plug; 2pcs Red Copper Gasket for Piggyback Drain Plug. Easy to Install: Step 1. Make sure you have thoroughly cleaned the oil pan thread area, there is no excess oil around the area or in the threads. Step 2: Thread the main plug into the hole, a few turns forward and then a few turns back. Once the plug reaches the end, slowly back it out, then use brake cleaner to clean away any loose thread material. Step 3: Use a T-wrench to tighten the plug to approximately 14 ft-lbs of torque. Product Description Installation Instructions: Step 1: Clean the oil pan before installing, making sure there is no excess oil around the area or in the threads. Step 2: Thread the main plug into the hole, a few turns forward and then a few turns back. Once the main plug reaches the end, slowly back it out, then use brake cleaner to clean away any loose thread material. Step 3: Use a T-wrench to tighten the plug to approximately 14 ft-lbs of torque. Step 4: After installing the main plug, tighten the piggyback plug. Note: When you need to remove the small piggyback plug to drain the oil, be sure to use a wrench to hold the main bolt still.